Monday, February 24, 2014
VENEER bubbles part 3 of 4
Heres the third article of the much anticipated VENEER series.
The first article explained how to deal with edge gluing loose veneer
The second article detailed filling in missing areas of veneer on painted furniture.
This time I will show you how to get bubbled surface veneer glued back down.

For these repairs you will need 3 items,
your wood glue, a shape utility knife, and a heavy weight.

In most cases you can see where the veneer has bubbled/lifted but
running your hand over the surface will also help find areas you dont see.

You have to get the glue underneath your veneer somehow.
The next step is the scarey one.

Use your uility knife to cut a slice into the bubble.
Use a sharp knife, and cut in the direction the grain runs.

Apply your glue getting into the cut and under the bubble.

You can squish it underneath the veneer with your finger,
you can use air to blow it under the edges,
do what ever you can think of just be delicate with the edges of the cut veneer.

Wipe up any excess glue with a damp cloth.
Now weigh your repair down.
Below you can see I used a cast iron urn (heavy) on a flat board,
I even used a small bit of folded sandpaper right over the glued spot as a pressure point.

** MINI VENEER TIP **
Wax paper wont stick to glue well.
It is a good buffering material to use
between your repair and any clamps or weights you use.
HAPPY CANADA DAY to everyone and to celebrate ...
todays SHOWROOM addition is a wonderful Lane Aromatic Cedar Lined Chest
Originally made in Ontario, Canada.


Peacock table
So I found these great solid maple pieces on CL. Two large chests/dressers and this 
cute little side table. I felt sort of sheepish because as the lady was helping me load them
into my truck she said, "I'm so glad these are going to someone who appreciates their beauty and won't
paint them." !!! ouch.....
Read more »Sunday, February 23, 2014
Susans Wine Bottle Stopper gift
Im making a birthday gift for my girlfriend, Susan. She asked for a set of wine bottle stoppers and holder, similar to the ones I made a while back. She likes the set I have in my kitchen.
Her birthday is in May, so I have plenty of time, but I started early to get it done as soon as possible. What she doesnt know is HOW they will look. The first one is a wine goblet on a pedestal.

As you can see, I hollowed it out on top as well.

The stand is the one I kept for myself. At this point I have milled the wood for hers, cut it to size and drilled the holes and recesses. But the wood needs sanding and finishing. So for these pictures I posed the first stopper with my holder.
Also, I have glued up a cedar block for the second stopper. It will be shaped like a wine bottle and will sit on a matching pedestal. It will have a hole drilled to make it look somewhat authentic.
More to come soon.
Read More..
Her birthday is in May, so I have plenty of time, but I started early to get it done as soon as possible. What she doesnt know is HOW they will look. The first one is a wine goblet on a pedestal.
As you can see, I hollowed it out on top as well.
The stand is the one I kept for myself. At this point I have milled the wood for hers, cut it to size and drilled the holes and recesses. But the wood needs sanding and finishing. So for these pictures I posed the first stopper with my holder.
Also, I have glued up a cedar block for the second stopper. It will be shaped like a wine bottle and will sit on a matching pedestal. It will have a hole drilled to make it look somewhat authentic.
More to come soon.
Walnut Pen
I have lunch almost every Thursday with one of my neighbors. He is a woodworking hobbyist as well. This past week I showed him one of my pens. He was excited and said he thought it would look great in walnut.
Well, I happened to have some walnut on hand so I made up the blanks yesterday. Today he came over and we went out to the shop and made his pen. The picture does not do justice to how well it came out. It is my best pen so far. I was able to get some finer papers and a polish that has a fine grit in it. Together it made the best finish.
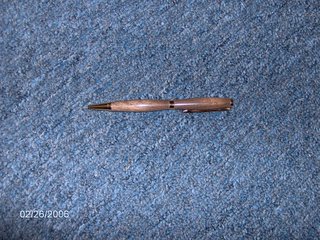
He LOVES his pen and was happy to be there as I turned, finished and assembled it. Hes going to pay me and has already asked for one for his wife. He said that she thinks she may want to give pens as Christmas gifts. So I better start stocking up.
Read More..
Well, I happened to have some walnut on hand so I made up the blanks yesterday. Today he came over and we went out to the shop and made his pen. The picture does not do justice to how well it came out. It is my best pen so far. I was able to get some finer papers and a polish that has a fine grit in it. Together it made the best finish.

He LOVES his pen and was happy to be there as I turned, finished and assembled it. Hes going to pay me and has already asked for one for his wife. He said that she thinks she may want to give pens as Christmas gifts. So I better start stocking up.
ANNIE SLOAN THE PAINTED LEATHER CHAIR
(Sounds like an adventure novel if you ask me)
Everyone has been asking to learn more about my painted leather chair, even Annie Sloan herself has been getting impatient with me. I didnt want to get everyone excited about something that might be a fail so the plan was to wait and finish this post now during the holidays offering some time and use to report how it is holding up. Unfortunately the trials of life stepped up this week to give us a warning.
Dec 24th was for last minute grocery shopping, a few small gifts and visiting with friends.
My well laid Christmas plans quickly changed first thing as the caller explained my Mother was on her way to the hospital having a stroke. It ended up being mild and she was home that same night to recover. My family spent the next 36 hours filling in where they were needed to get all her cooking, cleaning, wrapping, and decorating done. The holiday definitely had a different meaning for the grown ups and the kids simply asked why grandma was using a cane. I want to thank those who have sent messages, well wishes, and prayers.
Now its time to get back to the famous painted leather chair.

I think this has been my favorite painted chair project so far, maybe because Im keeping it.
Here is a look at some of my other painted upholstery.
My Union Jack chair and my French Berger chair were both very successful
and both offer different ways to redo upholstery with paint.


My painted leather parlour chair has settled into my space well
and I dont see it going anywhere soon.

It all started last summer when I got two of these chairs. You cant see it in these photos but there
was a lot of damage to the underside including the frame and leg that needed to be reinforced.

The original leather on the seats is old and worn with cracking which will crack the paint.
More on that at the end.

I sprayed the right chair in ASCP and distressed the frame with 220 sand paper.
When using my sprayer the paint is always watered down slightly, more info on my sprayer here:
http://blogspot.ca/2011/07/to-spray-or-not-to-spray-paint-sprayer.html
The color of the white chair is a 50 - 50 mix of AS Old White and Pure White.


When using my sprayer the paint is always watered down slightly, more info on my sprayer here:
http://blogspot.ca/2011/07/to-spray-or-not-to-spray-paint-sprayer.html
The color of the white chair is a 50 - 50 mix of AS Old White and Pure White.

The entire chair was then clear waxed.

Then a day later her frame was dark waxed.

The stripe and graphic came next. The stripe is AS Coco and marked out with painters tape.


After she was finished she was invited to attend a Home Show and hang out with Annie Sloan.
See there is Annie and George talking about the chair or me but they are pointing at the chair
Im sitting in, Im sure of it.


3 months later the seat is showing all the cracks the original leather already had.
The paint is not coming off but the cracks are showing and it looks great!!!
My favorite part about painting upholstery is that when you are done and you wax it,
it is now so easy to wipe clean with a cloth. I have also bit the bullet this fall and painted
a velvet chair to show you how costly and catastrophic it can be to paint the wrong type of material.
Dont hold your breath on that post but it will show up in your email eventually.
For more info and ideas check out my Pinterest Folder of Painted Upholstery here:
http://www.pinterest.com/firstfindsgg/chalk-painted-upholstery/
*************************************************
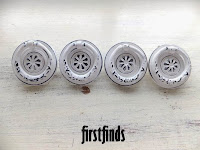
LOOKING FOR HARDWARE ...
Stop in to see whats new in shabby chic white hardware available at firstfinds.
There are 1000s of pieces of different upcycled hardware to choose from
Etsy Shop.


Saturday, February 22, 2014
Garden Obelisk Design Plans
Garden Decoration Idea: Garden Obelisk Plans
Garden Decoration Idea: Garden Obelisk Plans

Garden Decoration Idea: Garden Obelisk Plans
Garden Decoration Idea: Garden Obelisk Plans

Read More..
Garden Decoration Idea: Garden Obelisk Plans
Garden Decoration Idea: Garden Obelisk Plans
Garden Decoration Idea: Garden Obelisk Plans
Easy Small Closet Organizer Plans

Free woodworking plans for a reach in closet organizer that provides double hang, long hang, shoe and sweater shelves for a small closet.

If your current closet only has a typical single rod and single shelf you can see how much space gets wasted. With a little bit of wood and a few hours of time you can dramatically increase the space utilization of your closet. If youve been dealing with a small 3-4 closet you know how important it is to squeeze as much extra storage as possible.
Good shoes are expensive and just tossing them on your closet floor increases the likelihood they get damaged. Shoe shelves help protect the investment youve made in your shoes.
Providing space for long garments is also important and this organizer allows you room to hang up some of those long dresses or coats so you dont have to run to another room for them.
 |
| The Right Hangers Save Space |
You can customize the dimensions of these plans to better suit your needs just keep in mind these general guidelines. The shelving unit needs to be 42" tall to be able to hold the double hanging rod. Womens shoes generally need about 7" of width, mens shoes 9" and sweaters and other folded clothing 12". Every body is different so measure how much space your clothes take and see if you need to customize the plan to get more efficient use.
What Youll Need
Materials
- (2) 2 x 4 Sheets of 3/4" MDF or better yet Formaldehyde free PureBond Maple Plywood
- (1) 6 1x4 board
- (1) 6 1x2 Board
- 1/4" Nickel Shelf Pins
- Screws
- Primer and Paint
Tools
- Circular saw with guide or table saw
- Jig Saw
- Kreg Pocket Hole Jig
- Kreg Shelf Pin Drilling Jig
(Optional but recommended)
- Drill
- Hammer
- Prybar
- Level
- Measuring Tape
- Pencil
Cut List
- (5) ~12" x 14" Shelves 3/4" Plywood
- (2) ~12" x 9" Shoe Shelves 3/4" Plywood
- (2) ~12" x 42" Shelving Unit Sides 3/4" Plywood (See Cut Plan for exact shape)
- (1) 24" Rod Support 1x4 Board (or whatever the depth of your closet is)
- (2) 14" Stretchers 1x4 Board
- (2) 18" Shoe Shelf Supports 1x2 Board
Cut Plan
3/4" Plywood
The first quarter sheet of 3/4" plywood will be for the shelves. You may want to alter the number and width of the shoe shelves depending on your design. The depth will be slightly less than 12" because of the kerf of the saw. Do your best to cut it as evenly down the middle as possible.

The second sheet is where well cut the sides for the shelving unit. To be able to limit the amount of plywood necessary the cuts arent simple straight cuts. Again, the depth at the middle will be a little less than 12" due to the saw kerf. Its probably best to cut this out with a jig saw.

Boards
1x4: Two lengths of 1x4 need to be cut to the same width as the shelves, in our case 14" and one length that is determined by the depth of your closet for the lower rod support on the side wall.
1x2: One shoe support needs to be cut from 1x2 material for each side shoe shelf. The support needs to be long enough to reach from the back corner of the closet to at least the first side wall stud so that it is screwed securely at each end.
Step 1: Cut Lumber and Finishing
To minimize the time that the closet is out of service were going to build much of the closet organizer before installing it. This includes finishing the wood so that its dry when its installation time. If you dont have a lot of space to lay all the plywood out flat to paint, you might find it easier to paint after youve assembled the shelving unit or just paint everything after installing but youll have to wait until it dries before using the closet.
Double check your closet measurements and make any modification you need to the cut plan if you choose to customize the size based on your needs.
So that we can get 2 sides out of one 2 x 4 sheet of plywood theyre not cut straight. Start off by cutting the board down to 42" in length. If youre comfortable making plunge cuts with a circular saw its the best way to cut the horizontal cuts. The vertical cuts and rounded corners are best cut with a jig saw. You can also use a jig saw to make the entire cut just take your time and use a straightedge to get the cuts as straight as possible on the long stretches.
You may also want to increase the 4" to 6" or so for a little extra flexibility in positioning the lower rod.
You may also want to increase the 4" to 6" or so for a little extra flexibility in positioning the lower rod.

Once you have the 2 sides cut out, a notch will need to be cut out at the back bottom of each side to fit around your baseboards.
Once everything is cut, prime and apply two coats of water based paint. Let everything dry at least 2 days before continuing. Let the paint cure for at least a week (more if weather is humid) before placing items on the painted surfaces.
Step 2: Attach Top to Side
The shelving unit consists of 2 sides, 2 stretchers and 2 fixed shelves. Were going to begin constructing it by attaching the fixed top to one side using pocket hole screws from underneath.

Note that the back of the top is flush with the back of the side and the notch cut out in the back/bottom of the side for the baseboard so it will fit close up against the wall. The front of the top does not extend all the way to the front of the shelving side.
Step 3: Attach Bottom Shelf To Side
Next well attach the bottom to the side. The shelving unit needs 2 fixed shelves to make it sturdy. The location of the top shelf needs to be at the top but you have some flexibility when positioning the bottom shelf.
Ive planned for the bottom of the bottom shelf to be 12-1/2" from the bottom of the side but depending how big the items you plan to store in that area are, you might want to increase or decrease it. For example, if you want to store boots you may want to increase it.
Make sure the side is square to the front of the side and attach it using pocket hole screws as you did the top.

Step 4: Attach Stretchers To Side
Two stretchers cut from 1x4 boards are used to provide a way to attach the shelving unit to the wall as well as provide extra strength. Using pocket screws attach them to the side and fixed shelves as shown.

The bottom stretcher needs to clear the baseboard notch. If you want the shelf lower, mount the stretcher above the bottom shelf instead of below it.
Step 6: Attach Other Side
Finally well attach the other side of the shelving unit using the previously drilled pocket holes in the fixed shelves and stretchers. Its important that everything gets screwed together square.


Step 7: Drill Shelf Pin Holes
With the shelving unit completed we can now drill 2 rows of shelf pin holes on each side of the shelving unit. This is much easier to do with a jig like the Kreg Shelf Pin Drilling Jig.
For each set of holes use the same reference point. For example start all sets of holes by resting the bottom of the jig against the bottom shelf.
If you dont have a pocket hole jig you can either screw the shelves in directly using pocket hole scres or you can manually mark and drill the holes for the shelf pins. 1-1/4" spacing 2" from the front and back should do it.
Step 8: Move Existing Rod and Shelf
With the shelving unit complete and the rest of the components primed and painted its time to start preparing the closet. To save some money were going to reuse the existing rod and shelf. A typical closet has its shelf installed at around 66" above the floor.

To accommodate a double hang space the shelf and rod are going to need to be moved further up so that the bottom of the top shelf is at 84" above the floor.
Typically the closet will have 1x4 boards installed at the 66" mark on three walls that will support the shelf and rod. Try and determine how the boards are attached to the wall. Theyre probably just nailed in but sometimes theyll be screwed in.
Start by trying to remove the top shelf. Run a utility knife around the edges where the shelf meets the walls and 1x4s to break any paint that might be helping keep them together. Use a prybar to lift the top shelf off. If its not coming up easily check for any screws and unscrew them.
Next the closet rod should be easy to lift off.
Finally start removing the 1x4 support boards. We want to reuse all these pieces so take your time and try to avoid breaking them.
Use a level to draw a line as a guide to reinstall the existing closet rod and shelf. The tops of the support boards need to be at 84". To make installing easier draw your level reference line at 84" minus the width of board. Your boards may vary but if theyre 1x4s theyll be 3-1/2" wide. So draw a line at 80-1/2" above the highest point on the floor.
Now reinstall the support boards into the closet lining up the bottom of the boards with the reference line. That should put the top of the boards at 84".
Place the rod back in and then attach the shelf.
There will be some holes in your walls and mismatched paint so fill in any holes with spackle, and sand any paint edges. When the spackle dries, sand it smooth then prime and paint the entire closet. For a closet, water based low VOC paint like Benjamin Moores Aura is a good idea so that your clothes dont wind up smelling like paint.
Step 9: Install Shoe Shelf Supports
Before installing the shelving unit its a good idea to install the wall supports for the side shoe shelves now that theres plenty of room to work. Typically, shoe shelves are installed 7" apart but you can change that to suit your needs. Keep in mind that the shoe shelves will reduce the height of the long hang area. If you have especially long garments to hang you might want to limit the number of shelves youre installing. If you use special pants hangers on the lower bar of the double hang section there should be sufficient room for shoes underneath your pants if extra shoe storage is important.
The shoe shelf supports are cut from the 1x2 boards. Make sure you cut them long enough so that they can be attached to at least 2 studs near the ends of the support.
Draw two level lines on the side wall, one 7" up and the other 14-3/4" up from the floor. (Or more or less depending on how high your shoes are.) Use these lines as a guide to align the tops of the 1x2 boards and drill or nail them into the studs on the side wall.

Step 10: Install Shelving Unit
Position the completed shelving unit against the back wall. Its position in relation to the sidewalls will determine how much extra hanging space you get via the double hang section as well as how much long hanging section you have. In this design I chose to put the shelving unit 9" from the left side wall. That will provide 9" of long hang which is enough to hold 4-6 long hanging items. If you need more or less you can position the unit as you see fit. I think its a good idea for all closets to have at least some long hang area.
The position of the shelving unit will also determine the length of the extra shoe shelves on the left. Since you should have cut out the shoe shelves before this point you can rest one of the shoe shelves on the shoe shelf support and use it to determine where to position the shelving unit.

Once you have the shelving unit where you want it, make sure its level and plumb then secure it to the wall by screwing it into studs through the back stretchers.
Step 11: Install Lower Rod Support
The lower rod support is a 1x4 board that is cut to be as long as the depth of the closet. Screw or nail it into studs on the right wall so that the top of the support is 42" above the floor. You can also draw a level line from the top of the shelving unit to determine where to position the support. Make sure it is installed level.

With the rod support in place you can now install the closet rod. Directions will depend on what rod you use but its important that the top-center of the rod is about 12" away from the back wall and about 1-1/2" down from the top of the shelving unit top and that the rod is installed level.
Step 12: Install Shoe Shelves
To install the shoe shelves, pocket holes will be drilled on the underside of the right side to attach to the shelving unit. On the wall side screws will be drilled from the top down into the wall supports. Drill pilot holes and countersinks so the screws are flush with the top or you can simply nail the shelves in place. Pilot holes are a good idea to prevent splitting the wood.

Step 13: Install Adjustable Shelves
Push the shelf pins into the appropriate holes depending on how youd like to space the shelves in the shelving unit. Then place the shelves on top of the pins. Once the paint dries you can fill up your closet again.
If youd like to add a drawer or two see my instructions on how to build drawer boxes.

Subscribe to:
Posts (Atom)